Get the Look: Bronzed
Thursday, December 30, 2010My Rimmel Mousse Bronzer arrived in the mail yesterday, so today, I tried it out, and I just wanted to share the look with everyone. It's my first time testing the bronzer, so I'll be testing out its staying power and will come back with a review soon!
Unfortunately, the photos didn't quite capture the depth of the bronzer properly, but it was quite lovely. A nice dark reddish brown.
A few readers recently asked for some photo-detailed makeup tutorials (and some asked for YouTube videos but I can't bring myself to do that!), so here's a photo filled how-to for a bronzed look.
Start with a prepped and primed face. Primer is important for this look, as it will hold your bronzer in place. Otherwise, it is likely to fade after a couple of hours.
Using a contour shade (you can also use a matte, non-shimmery bronzer for this), lightly contour under your cheekbones, along the bridge of your nose, and into your eye crease.
Then apply your bronzer. Using an angled brush (or you can use your fingers if you're using a mousse bronzer), apply the bronzer in a '3' shape from your temples, down under your cheekbones, and then underneath your jawline.
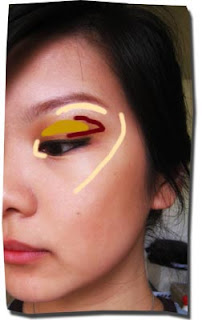
Sweep a golden brown colour onto your eyelid. Then, take a dark brown and focus it on the outer V of your eye. Blend the dark brown inwards until there are no harsh lines. (I didn't use a primer because I was in a hurry, but using a primer will bring out the colour in your eyeshadow, so it will look more pigmented than in the picture)
When blending the dark brown shadow, those with monolids or Asian eyes with less prominent double-eyelids might want to blend the shadow outwards, going past the crease. This helps create depth to your look. Also, it helps to blend the dark brown shadow above your golden brown shadow (not onto), all the way toward your inner eye. Again, this helps create depth.
Then, take a shimmery highlighter and highlight on top of your cheekbones, the top of the bridge of your nose, and underneath your brow bone. Also, you can dab a little of this onto the inner corner of your eyes.
Line your eyes, winging them out at the outer corners. A few ways you might want to 'map' your winged eye is to follow the curl of your lashes, or to aim the end of your wing for the end of your eyebrow.
Curl your eyelashes, then coat with 2-3 coats of mascara. If you want, you can insert false eyelashes for a more dramatic nighttime look.
Finish off with a coat of lipgloss and you're done!
Here are the finished pictures, with and without flash.
And here are the products I used to create the look!
Stila's Illuminating Tinted Moisturizer
Skin Doctor MD Sunblock
Giorgio Armani Luminous Silk Foundation in Shade #4
Rimmel 8Hr Mousse Bronzer in Medium Glow
Elianto Christmas Palette (Golden brown and dark brown shades)
TheBalm Mary Lou-Manizer
EcoTools 5pc brush set
MAC Fluidline in Blacktrack
Eyelash curler
Diorshow Mascara in Blackout
Clinique Color Surge Lipstick in Natural Gloss (discontinued)
Clinique Long Last Gloss in Whisper
Disclaimer: I am in no way claiming to be an expert at makeup. This is just me having fun, and sharing what I am slowly learning with anyone who might be interested. I hope you have fun experimenting, and if you have a tip to share, or a question to ask, I'd be really glad to hear from you!
Have a great day, everyone!


1 comments