
Makeup Basics: How to Contour and Highlight Your Face
Monday, March 21, 2011Happy Monday, everyone! At least, I hope you're having a happy Monday :)
I have another simple post to add to my Makeup Basics series. This one is about contouring and highlighting your face.
Edit:
Please note that I have updated my contouring routine, and have filmed a YouTube tutorial for it. See below for the embedded video!
Contouring and highlighting can really add dimension to your face, not to mention conceal areas that you want hidden and brighten areas you want highlighted. It also helps you fake a healthy, sunkissed glow.
Contouring the Face
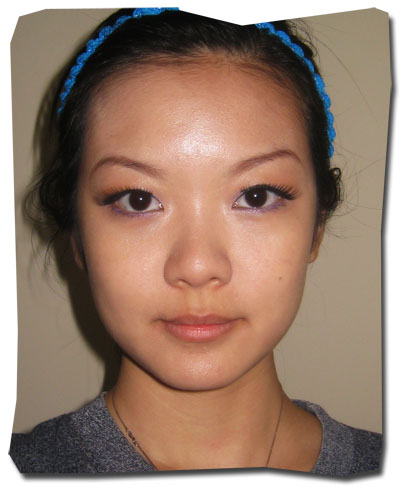
I'm starting here with a blank canvas - pictured below is a picture of my face which hasn't been contoured yet.
The most basic step to contouring is the "3" shape. As shown by the darker shading in the picture below, use a contour shade to form a "3" shape, framing your face. It basically starts from the forehead down to the temples, then underneath your cheekbones, and then down to your jawline. This will define your cheekbones and also make your face appear slimmer.
The light yellow shades indicate the places where you should highlight your face. The highlight under the eye and on the inner corners of the eyes are meant to lift the eye and open up the eye, respectively. The highlight on the cupid's bow is meant to define your lips.


You can also add the contour colour underneath your bottom lip. This gives the illusion of fuller lips.
A few things to note when choosing your contour and highlight shades:
- The colour of your contour shade should be the colour of your skin where the shadow falls on your face
- The shade should be matte - shimmery shades tend to make you look 'dirty'
- You can use a foundation that is a shade or two darker than your skin tone, or a bronzer is a great contouring tool
- Your highlight shade is ideally shimmery and frosty
- For highlighting your cheekbones and the tip of your nose, use a large fluffy brush to spread out the pigment evenly
- For contouring your cheeks and face, you can use an angled contour brush, or a small fluffy brush to concentrate the shade
- For contouring your nose, I highly recommend a blending brush, so the lines don't come out too harsh - remember to blend very well!
Contouring the nose
Nose contouring is a little more complicated than face highlighting.
Generally, the best way to contour a nose would be to place the contour colour all the way down both sides of the bridge of the nose, stopping before the tip.
When you get to the tip, contouring then depends on what kind of nose you have. If you have a larger tip like mine is, bring the contour shade down your tip in a "V", as illustrated in the picture below.

Also note that my face looks slimmer and more dimensional compared to the first picture above, because of the contouring
If you have a relatively small tip, then you want to wing the contour shade outwards at the tip, forming a sort of upside-down V.
This is largely trial and error, because some noses are best left alone, otherwise you might make your problem area more prominent instead. Try these techniques at home with a flash camera. If the contouring is doing nothing for you, then skip it.
Below is the final picture, after contouring and highlighting.

A few contouring palettes and shades that I recommend are:

Stila's Contouring and Highlighting Trio
Benefit's Hoola Bronzer - a matte, one shade fits (almost) all bronzer. Great for contouring
Stila's Highlighting and Contouring Trio - a great palette for beginners. It comes with an instruction booklet teaching you the contouring basics
Sleek Contour palette - a great, more affordable version of the Benefit Hoola bronzer
A few wonderful highlighters are:
TheBalm Mary Lou-Manizer
Benefit Moonbeam, Girl Meets Pearl
Stila All Over Liquid Illuminator
I hope this helps! Check out my previous post for tips on how to contour your eye area.
And as promised, here is my new contouring routine (it is perfect for both Caucasian and Asian features, but has extra tips for Asian features).


18 comments