


Happy Friday everyone! The RiRi Hearts MAC Fall Collection just launched a few days ago, and all over the world people were clambering into MAC stores hoping to get their hands on this collection. I fell in love with Rihanna's dark berry toned lipstick and just had to create a makeup tutorial inspired by that look. I wish I could have gotten the same lipstick colour, but by the time I got to my local MAC store, the lipstick had already sold out, so I settled for another MAC lipstick colour that is almost the exact dupe of the Rihanna's Talk That Talk lipstick, except that it is a Cremesheen while the Rihanna lipstick is matte.
I didn't have to do much adjustment for the eye makeup look, because this style of eye makeup is perfect for hooded lids and monolids as is. Here is the makeup tutorial. I hope you enjoy!
Here is a list and mini reviews of the products used.
Bobbi Brown Luminous Moisturising Treatment Foundation - one of Bobbi Brown's latest releases, this sheer coverage foundation is lightweight and very moisturising without being sticky or heavy. I found that it keeps your skin glowy without being too oily, so this is perfect for the coming warmer weather in Australia, and for everyday use in Malaysia. I recommend it for normal skin, combination skin, and dry skin. The finished effect is beautiful, a kind of matte glow that doesn't enhance any oily areas. A great option if you want a slight glow to your skin, but don't want to bring out an oily T-zone.
The Body Shop Bronze Eye Palette - The Body Shop's eyeshadows are great because they are soft and buttery, easy to blend, and very pigmented. This palette is great for neutral to warm skin tones, and I love that the shimmer is very fine. These are comparable to the Naked palette, really.
Bobbi & Katie Palette - Bobbi Brown makes beautiful eyeshadows, and even better eyeshadow palettes. This one contains two Pot Rouges (which you can use both on your cheeks and lips), plus eight eyeshadows, plus an eyeliner pencil. Bobbi's eyeshadows are very pigmented, so this palette will last you a while and then some. These palettes always come packaged with eyeshadows that can create both daytime and nighttime looks, in complementing colours.
Anastasia Beverly Hills Beauty Express Kit in Brunette - read full review here.
Clinique Brush on Cream Liner in True Black - this is my absolute favourite gel liner. It doesn't smudge, doesn't melt, doesn't dry up in the pot, and is very pigmented and easy to use.
Shiseido Natural Finish Cream Concealer - a newly-discovered concealer that's fast becoming one of my favourites. Read full review here.
Tom Ford Face Illuminator in Fire Lust - Tom Ford products are just dreamy, no matter what the product is. This Face Illuminator is one of his latest releases, and Fire Lust is a peachy gold colour that just lights up the skin. It gives your face a beautiful glow without appearing shimmery or glittery, and has a lightweight texture. You can mix it into your foundation for daytime or apply it on top of your foundation for a more dramatic nighttime glow.
Tom Ford Shade and Illuminate in Intensity One - my favourite cream contour product. It is the best, most natural-looking product that I have ever used, and I absolutely love it!
Revlon Naturals Blush in Plumberry - a lovely contour/blush palette with in a deep berry shade. Available at www.fashionaddict.com.au
Prestige Lip Liner in Wine
MAC Cremesheen in Hang-Up - this lipstick is almost a perfect dupe of the Rihanna Talk That Talk lipstick, but is a cream textured lipstick as opposed to Rihanna's matte one. Aside from differences in texture, though, it is almost exactly the same colour. I am so glad for that too, because I was so set on creating this makeup tutorial. I would've been gutted if I wasn't able to find a lipstick to create this look with.
On my nails: Tom Ford Nail Lacquer in Vapor - this is a very pearlescent white with a hint of silvery shimmer shot through. Beautiful to apply, as with all other Tom Ford products, and so perfect for the coming summer season!
This is a very, very late video, I know! I hope you guys enjoy it anyway.

Products mentioned:
Thank you for watching! x

If you have any questions about any of the products mentioned, I am happy to answer them. Just leave me a comment or send me an email! :)
Products mentioned:
Organix Hydrating Moroccan Argan Oil AUD 16.99
L'Oreal Volume Collagen Texturising Shampoo (review here)
Biore Deep Cleansing Pore Strips
L'Oreal Youth Code Luminosity Moisturiser
Shu Uemura Tsuya Skin Under Base Mousse
Sally Hansen Cuticle Eraser + Balm
Alpha-H Liquid Gold Smoothing & Perfecting Mask
Dior Diorskin Nude Skin Glowing Makeup (review here)
i.d. Bare Minerals Original Foundation
MAC Select Cover Up Concealer
Physicians Formula Cashmere Wear Ultra Smoothing Bronzer
ck one color Quad in 700 Boho
Daiso 10mm Individual Lashes
Batiste Dry Shampoos
Toni & Guy Hair Meets Wardrobe Dry Shampoo
Thank you for watching! x
Hello everyone! This post is a little late, because I've had quite a few things to deal with, but it is finally up and I hope you guys enjoy it!

So as promised, here's my step-by-step guide to a long-wearing, shaped red lipstick.




And that's it! Here are a couple of products that I used to create this tutorial.

I have posted swatches of these lipsticks below:


As I mentioned earlier, the concealers used around the lip need to be moisturising. My favourites are the MAC Select Moisturecover and the Kevyn Aucoin Sensual Skin Enhancer.
I hope this post helped you! x

So as promised, here's my step-by-step guide to a long-wearing, shaped red lipstick.

Before you start, apply a lip balm and leave it in for 2-3 minutes. I love the Simplicité Angelica Lip Care Balm. It is gorgeous and very moisturising. Then, grab a cotton bud and rub it along your lips to remove any dry, loose skin.
Now you're ready to apply your lipstick.

First, apply your favourite red lipstick. Stay within your lip lines.

Next, use a lip liner to line your lips. At this point, you can shape your lips and draw them as you like. You can draw the line slightly outside your natural lip line to make your lips appear fuller.

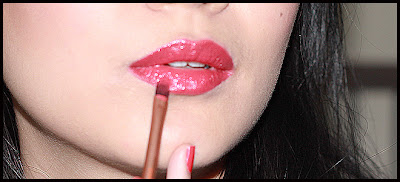
Then, using a lip brush, apply another coat of lipstick to your lips. A lip brush will help you control the application of the lipstick and help you create smooth, perfect lines.
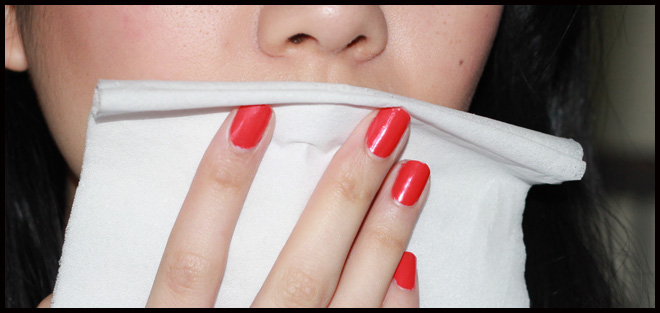
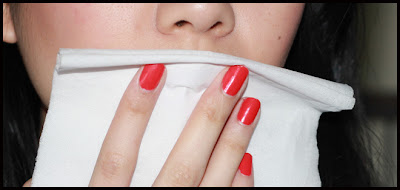
Blot the lipstick once you've applied it. This filters it down to a thin layer that you can then build up on. Building up thin layer upon thin layer helps the lipstick last longer than applying one thick coat of lipstick.
Reapply a coat of lipstick, then blot again, then apply again.

Next, using a small concealer brush, apply concealer to the outside of your lip, especially around the outer corners. This will perfect and also lighten the line around your lips, which will make them look more perfect and full. Try to use a moisturising concealer, because the area around your lips is most likely dry and may have some fine lines. A moisturising concealer will help disguise any of these imperfections.

Finally, apply some lipgloss to the centre of your lips. This creates the illusion of fuller lips.
And that's it! Here are a couple of products that I used to create this tutorial.
Some great lipstick shades that match a myriad of skin tones are, as shown from left to right:
Tom Ford Private Blend Lip Color in True Coral - this is a lipstick with an orange undertone which matches both very fair skins as well as warmer skin tones.
ck one color Pure Color Lipstick in Loudmouth - this is a dark red with a plummy undertone. Plummy undertones suit both warm and cool undertones in the skin.
Lancome Rouge in Love in 163M - this is a red with a bluish base which suits more neutral skins as well as cool skin tones
NYX Round Lipstick in Snow White - this is the most blood-red lipstick I have ever seen! This kind of blood-red colour suits every skin tone and is very flattering on the skin. It really stands out on the skin though, so if you're a first time wearer, be warned!
Australis Show Stopper Gloss Stick in Fireworks - this is for people less experienced with red lipsticks. It is more sheer, and also very easy to apply because of its stick form.
L-R: Australis 'Fireworks', ck one 'Loudmouth', Lancome 163M, NYX 'Snow White', Tom Ford 'True Coral'
As I mentioned earlier, the concealers used around the lip need to be moisturising. My favourites are the MAC Select Moisturecover and the Kevyn Aucoin Sensual Skin Enhancer.
I hope this post helped you! x
Hello everyone! I finally have another video tutorial to share with you - this one was inspired by the K-pop smoky eye.
Here are a couple of pictures of the look, along with my brand new hair! My aunt (a salon owner back home) is in town for a visit and my whole family was all over me to get a haircut, so I did!
My apologies for the lousy quality of the pictures - I keep forgetting to take pictures with a proper camera after I'm done filming!
.JPG)
.JPG)
And here is the video!
Products used:
Dermalogica Skin Perfect Primer (review to come)
Dior Diorskin Nude Fluid Cult Foundation in 020 (review to come)
Benefit Creaseless Cream Shadow/Liner in Strut
Concrete Minerals eyeshadows in Wicked and Kinky
NYX Ultra Pearl Mania eyeshadow in Lilac Pearl
Sleek Contour Kit in Medium
Clinique Brush-on Cream Liner in True Black
Becca Shimmering Skin Perfector in Opal
Giorgio Armani High Precision Retouch Concealer in #4
MAC Select Cover Up in NC20
Bobbi Brown Shimmerbrick Compact in Wildrose
Manicare Glam Eyes Crystal Face Jewels
Thank you so much for watching! Please subscribe and share the video if you liked it! x
Here are a couple of pictures of the look, along with my brand new hair! My aunt (a salon owner back home) is in town for a visit and my whole family was all over me to get a haircut, so I did!
My apologies for the lousy quality of the pictures - I keep forgetting to take pictures with a proper camera after I'm done filming!
.JPG)
.JPG)
And here is the video!
Products used:
Dermalogica Skin Perfect Primer (review to come)
Dior Diorskin Nude Fluid Cult Foundation in 020 (review to come)
Benefit Creaseless Cream Shadow/Liner in Strut
Concrete Minerals eyeshadows in Wicked and Kinky
NYX Ultra Pearl Mania eyeshadow in Lilac Pearl
Sleek Contour Kit in Medium
Clinique Brush-on Cream Liner in True Black
Becca Shimmering Skin Perfector in Opal
Giorgio Armani High Precision Retouch Concealer in #4
MAC Select Cover Up in NC20
Bobbi Brown Shimmerbrick Compact in Wildrose
Manicare Glam Eyes Crystal Face Jewels
Thank you so much for watching! Please subscribe and share the video if you liked it! x
In
Arbonne,
Daniel Sandler
Makeup Tutorial: Easy Smoky Eye to Lift and Define Monolids and Hooded Lids
Hello everyone!
I have a new makeup tutorial to share with you guys. It's a pretty, simple smoky eye that lifts and defines both monolids and hooded lids. It's really simple to do and I wanted to have a little play with some products that I was sent by Arbonne and Ellis Faas.
Here are a couple of pictures:


Here's the tutorial!
Products used:
Arbonne Cosmetics Perfecting Liquid Foundation in Fair
MAC Select Cover Up in NC20
Shu Uemura H9 Eyebrow Pencil in Seal Brown
Uriage Bariederm Lipbalm
Arbonne Cosmetics Eye Shadow in Ocean
Arbonne Cosmetics Eye Shadow in Titanium
Ellis Faas Lights in E304
Face of Australia Impact Curl Mascara
Daniel Sandler Watercolour Blush in Cherub
Illamasqua Powder Blush in Disobey
Sisley Golden Touch
Kryolan High Gloss in Toffee
I hope you enjoyed the tutorial!
I have a new makeup tutorial to share with you guys. It's a pretty, simple smoky eye that lifts and defines both monolids and hooded lids. It's really simple to do and I wanted to have a little play with some products that I was sent by Arbonne and Ellis Faas.
Here are a couple of pictures:


Here's the tutorial!
Products used:
Arbonne Cosmetics Perfecting Liquid Foundation in Fair
MAC Select Cover Up in NC20
Shu Uemura H9 Eyebrow Pencil in Seal Brown
Uriage Bariederm Lipbalm
Arbonne Cosmetics Eye Shadow in Ocean
Arbonne Cosmetics Eye Shadow in Titanium
Ellis Faas Lights in E304
Face of Australia Impact Curl Mascara
Daniel Sandler Watercolour Blush in Cherub
Illamasqua Powder Blush in Disobey
Sisley Golden Touch
Kryolan High Gloss in Toffee
I hope you enjoyed the tutorial!
Hi guys! I have another highly requested video to share today - how to contour and highlight your face.
The technique that I like to use is inspired by Kim Kardashian's contouring technique. If you have any questions, please let me know in the comment box below. Otherwise, enjoy the video!
Products used:
Kiehl's Rosa Arctica Youth Generating Cream
Illamasqua Skin Base Foundation in 01
Chanel Pro Lumiere foundation - discontinued (review and possible replacements here)
Tom Ford Shade and Illuminate in Intensity One (guest review on The Plastic Diaries)
MAC Select Moisturecover in NW20
Kevyn Aucoin Sensual Skin Enhancer in 05
Laura Mercier Translucent Loose Powder
Sleek Contour Kit in Medium
Tarte Amazonian Clay Blush in Dollface
Sleek i-Divine Palette in Oh So Special
Chanel Illusion d'Ombre in Illusoire
Skin Food Mascara Base
Covergirl Natureluxe Waterproof Mascara in #520 Very Black
Vani-T Mineral Lip Definer in Lolittle
Revlon Lip Butter in Strawberry Shortcake
Luview Glossy Kiss lipgloss
I hope you guys enjoyed watching the video! It would mean so much to me if you would subscribe if you like my channel and videos. Thanks again for watching! x
The technique that I like to use is inspired by Kim Kardashian's contouring technique. If you have any questions, please let me know in the comment box below. Otherwise, enjoy the video!
Products used:
Kiehl's Rosa Arctica Youth Generating Cream
Illamasqua Skin Base Foundation in 01
Chanel Pro Lumiere foundation - discontinued (review and possible replacements here)
Tom Ford Shade and Illuminate in Intensity One (guest review on The Plastic Diaries)
MAC Select Moisturecover in NW20
Kevyn Aucoin Sensual Skin Enhancer in 05
Laura Mercier Translucent Loose Powder
Sleek Contour Kit in Medium
Tarte Amazonian Clay Blush in Dollface
Sleek i-Divine Palette in Oh So Special
Chanel Illusion d'Ombre in Illusoire
Skin Food Mascara Base
Covergirl Natureluxe Waterproof Mascara in #520 Very Black
Vani-T Mineral Lip Definer in Lolittle
Revlon Lip Butter in Strawberry Shortcake
Luview Glossy Kiss lipgloss
I hope you guys enjoyed watching the video! It would mean so much to me if you would subscribe if you like my channel and videos. Thanks again for watching! x
So acne. A total eyesore, and sometimes it takes ages for a spot to go away. After the acne spot comes the acne scarring or pigmentation, even though you didn't do anything to aggravate the spot before it went away. Everyone hates it, and I have a couple of products to show you that may help you conceal them so that you never have to be caught in in daylight with those ugly suckers ever again.


Disclaimer: This post only shows you how to conceal the redness and discolouration that you get with acne and post-acne scars. There isn't much you can do to conceal the bumps on your face except ice them a little before you head out, so you will have to be patient and treat the area until the bump reduces in size.

First up are (obviously!) the concealers.
When you conceal acne, you want to keep the coverage on your entire face moderate, and only spot-conceal where you need it. Spot concealing is when you use a small concealing brush to dot concealer on top of the pimple, and blend it out. This technique disguises blemishes without you having to cake a large amount of foundation onto your face. The end result is a much more natural-looking finish, whilst still being able to cover the spots you need covered.
You need a concealer with good coverage and staying power to cover a spot. Anything that is too sheer will only end up dulling down the colour of the spot, which still leaves you with a weird purplish spot on your face.
The above concealers are some of the best I concealers I have come across in terms of acne concealing. The Vicy Dermablend Ultra-Corrective Cream Stick and the Kevyn Aucoin Sensual Skin Enhancer have the highest coverage, but if you have spots that are aggravated (where the skin around the spot is dry and shrivelled), then you want to use something that is very moisturising - the MAC Select Moisturecover is perfect for that.
The most important thing when it comes to concealing acne is that your concealer should match your skin shade exactly. When you are concealing acne, you want to be able to spot conceal with a thick layer of concealer, and the only way you can do that is if piling on the concealer doesn't make you end up with a white dot on your face where the spot used to be. I find the Bourjois and NVEY Eco concealers both great matches for my skin, and they are easy to blend and stay put, which is always important when you are concealing!
There are also great foundations that offer moderate coverage for more severe cases of acne. When you are looking for a foundation with good coverage, the important thing is to make sure that these products don't look cakey on the skin.
The Clinique Anti-Blemish foundation is great for oily skins, as its velvety texture keeps the oil at bay whilst still keeping the skin looking healthy and not dried-out.
The Luview Crystal Cover BB Cream is gorgeous, has very good coverage, and keeps the skin looking plump and healthy. If you are using m skincare products that cause your skin to dry out and peel, this is a great option. Just top it off with some mattifying powder where needed to keep the oiliness away.
Clinique Even Better also offers amazing coverage, and has a gorgeous semi-matte finish. This foundation gives you a gorgeous glow, and doesn't look at all cakey on the skin. This is my favourite foundation to use on my sister, who has a lot of redness. She looks amazing, and the product doesn't irritate her skin.
It is also extremely important to set the concealer with a powder so that the product stays on the skin and doesn't smudge or melt off easily.
I prefer finely-milled compact powders over loose powders, because compact powders are much easier to use and are much more purse-friendly.
My personal favourite is the Tom Ford Illuminating Powder, because it is very finely milled (which means that it will do a superb job at setting your concealer and won't look cakey or flash back on camera) and has a very subtle illuminating shimmer running through it, which brightens the face.
If you are looking for a cheaper option, the Sleek Luminous Pressed Powder is also great. It comes in a number of different colours as well, so the range caters to almost all skin tones.
Your makeup tools are also very important when it comes to concealing acne! Here are my favourite brushes to use:
For spot concealing, I love using the Real Techniques Accent Brush, or the Hakuhodo Eyeliner Brush. Both these brushes were made to serve other functions, but I find them perfect for spot concealing. I just pick up some concealer with either brush, and dot the concealer onto my spot, then blend it out with my finger. I like the Hakuhodo brush for the more creamy concealers like the Kevyn Aucoin and the Bourjois, and the Real Techniques I use for the more solid concealers, like the Vichy Dermablend and the NVEY Eco.
For setting the concealer, I look for brushes that are extremely soft, so that they don't disturb or move around the concealer. The Real Techniques blush brush is the most plush, soft-as-a-baby's-bottom brush I have ever tried, and it doesn't brush away all the work I did with the concealer.
That's about it for my favourite concealing products! I hope you found this useful, and if you have any tips for concealing, please let me know!
Hi guys! I finally have my YouTube tutorial ready to go!
Firstly, here are a couple of pictures that I took on Instagram of the look:


And here's the video:
And of course, the products mentioned and used in the video:
Luview Aqua Essence Whitening BB Cream
Clinique Even Better Foundation in Beige
MAC Select Moisturecover Concealer in NW20
Australis Ready Set Go Finishing Powder
YSL 4 Color Harmony for Eyes in Tawny
NP Set Red Carpet Set palette
INIKA Light Reflect Highlighting Creme
INIKA Mineral Bronzer in 02 Sunkissed
I hope you guys liked the video! Please subscribe to my YouTube channel and spread the word, I would really appreciate it! ♥
Firstly, here are a couple of pictures that I took on Instagram of the look:


And here's the video:
And of course, the products mentioned and used in the video:
Luview Aqua Essence Whitening BB Cream
Clinique Even Better Foundation in Beige
MAC Select Moisturecover Concealer in NW20
Australis Ready Set Go Finishing Powder
YSL 4 Color Harmony for Eyes in Tawny
NP Set Red Carpet Set palette
INIKA Light Reflect Highlighting Creme
INIKA Mineral Bronzer in 02 Sunkissed
I hope you guys liked the video! Please subscribe to my YouTube channel and spread the word, I would really appreciate it! ♥
Hi guys! I have another makeup tutorial for you today - it took me forever to upload this video, but it is finally up and I am very excited about it!
It was only after I posted this video that I realised it was inspired by the look that Katniss wore in The Hunger Games. Here it is - I hope you guys like it!
Here is a list of all the makeup products I used in this video:
Estée Lauder Idealist Even Skintone Illuminator
Chanel Pro Lumiere foundation
Anastasia Beauty Express Kit in Brunette
Models Prefer Eye Primer
Sleek i-Divine Mineral Eyeshadow Palette in Storm
Sleek Molten Metal Eyeshadow Duo
Sleek Contour Kit in Medium
Avon mark. Metalliner in Blue Chrome
MAC Eye Kohl in Smolder
Maybelline Instant Age Rewind Concealer in Light
Vichy Dermablend Ultra Corrective Foundation Cream Stick in Opal
Clinique Fresh Bloom Allover Colour in Posy
INIKA Light Reflect Highlighting Creme
Tom Ford Private Blend Lip Color in Vanilla Suede
Uriage Thermal Water
It was only after I posted this video that I realised it was inspired by the look that Katniss wore in The Hunger Games. Here it is - I hope you guys like it!
Here is a list of all the makeup products I used in this video:
Estée Lauder Idealist Even Skintone Illuminator
Chanel Pro Lumiere foundation
Anastasia Beauty Express Kit in Brunette
Models Prefer Eye Primer
Sleek i-Divine Mineral Eyeshadow Palette in Storm
Sleek Molten Metal Eyeshadow Duo
Sleek Contour Kit in Medium
Avon mark. Metalliner in Blue Chrome
MAC Eye Kohl in Smolder
Maybelline Instant Age Rewind Concealer in Light
Vichy Dermablend Ultra Corrective Foundation Cream Stick in Opal
Clinique Fresh Bloom Allover Colour in Posy
INIKA Light Reflect Highlighting Creme
Tom Ford Private Blend Lip Color in Vanilla Suede
Uriage Thermal Water
Hello everyone! I just posted a new video - my eyeliner application tips, tricks, and beauty secrets :)
I love wearing eyeliner. I love how it darkens my eyes, I love how it defines my eyes, and I love how with a little flick, I can change my eye shape and create an entirely different makeup look.
I have tried out a lot of different eyeliners, and a lot of different application techniques, and this video shares as many of those tips that I can remember.
Here's the video, I hope you enjoy it!
Here's a list of the products I mentioned:
Prestige Total Intensity Eyeliner in Deepest Black (AUD 14.95)
Avon Supershock Gel Eyeliner in Black (unavailable in Australia - try eBay for some great deals)
Clinique Quickliner for Eyes Intense in Intense Plum (AUD 34)
Sisley Phyto Khol Star Glittering Eyeliner in Dark Amethyst (review and swatches here)
Clinique Brush On Cream Liner in True Black
MAC Fluidline in Blacktrack
Face of Australia Liquid Eyeliner
Thank you so much for watching :)
I love wearing eyeliner. I love how it darkens my eyes, I love how it defines my eyes, and I love how with a little flick, I can change my eye shape and create an entirely different makeup look.
I have tried out a lot of different eyeliners, and a lot of different application techniques, and this video shares as many of those tips that I can remember.
Here's the video, I hope you enjoy it!
Here's a list of the products I mentioned:
Prestige Total Intensity Eyeliner in Deepest Black (AUD 14.95)
Avon Supershock Gel Eyeliner in Black (unavailable in Australia - try eBay for some great deals)
Clinique Quickliner for Eyes Intense in Intense Plum (AUD 34)
Sisley Phyto Khol Star Glittering Eyeliner in Dark Amethyst (review and swatches here)
Clinique Brush On Cream Liner in True Black
MAC Fluidline in Blacktrack
Face of Australia Liquid Eyeliner
Thank you so much for watching :)
Hi guys! I have a new video to share with you all today - it's the first of my Valentine's Day makeup tutorials.
This is a nice smoky brown with a hint of purple. I did something similar a while back, but I didn't have it in video format so I thought I'd redo it, especially since I am loving this look at the moment and I think it would be perfect for Valentine's Day!
Here are a couple of pictures I snapped of the look:


And here's the video!!
Below are the products mentioned in the video:
Natural Compatibles Liquid Foundation in LF3
This is a nice smoky brown with a hint of purple. I did something similar a while back, but I didn't have it in video format so I thought I'd redo it, especially since I am loving this look at the moment and I think it would be perfect for Valentine's Day!
Here are a couple of pictures I snapped of the look:
And here's the video!!
Below are the products mentioned in the video:
Natural Compatibles Liquid Foundation in LF3
Anastasia Beauty Express Kit in Brunette
Inglot Matte 360 Eyeshadow
The Face Shop Lovely ME:EX Eyes in BK903 (review here)
Thanks for watching guys. If you liked the video, please subscribe. Thanks so much! :)
Inglot Matte 360 Eyeshadow
The Face Shop Lovely ME:EX Eyes in BK903 (review here)
NYX Jumbo Eye Crayon in Purple
NYX Single Eyeshadow in Purple
Ellis Faas Creamy Eyes in E103 (review here)
Maybelline Instant Age Rewind Concealer in #20 Light
Laura Mercier Translucent Loose Powder
Urban Decay Eyeshadow in Vapour
Tarte Amazonian Clay Blush in Dollface
MAC Lipstick in Snob
Luview Glossy Kiss lipgloss (milky pink end)
Thanks for watching guys. If you liked the video, please subscribe. Thanks so much! :)
Hi guys! How was your Boxing Day? I went out shopping with the boyfriend and sisters and ended up getting some lovely Burberry eyeshadows! The texture of the eyeshadow and the colours are to die for!
Anyway, I just wanted to quickly post a little trick I learnt from wearing nude lips so much recently (I blame the Face of Australia Lip Quench Lipstick in Lychee Crush for my nude lip addiction!). It helps create the illusion of thicker, more luscious lips. Personally, this trick works amazingly well (okay, as well as it can work) on me, and I hope that it will help you out a little too!
So here's how you do it:
First, line your lips with a nude-ish shade of lipliner. Make sure that it is slightly darker than the shade of nude lipstick that you will be wearing.


Here's the finished look:

This was a really short post, but I hope it helped anyone looking to add a little volume to their lips! x
Anyway, I just wanted to quickly post a little trick I learnt from wearing nude lips so much recently (I blame the Face of Australia Lip Quench Lipstick in Lychee Crush for my nude lip addiction!). It helps create the illusion of thicker, more luscious lips. Personally, this trick works amazingly well (okay, as well as it can work) on me, and I hope that it will help you out a little too!
So here's how you do it:
First, line your lips with a nude-ish shade of lipliner. Make sure that it is slightly darker than the shade of nude lipstick that you will be wearing.
Then, apply your favourite shade of nude lipstick. In this picture, I am wearing L'Oreal Color Riche Lipstick in Fairest Nude.
Here's the trick: After you apply the lipstick, using your finger, rub it in at the edges of your lips, softening the lipliner and erasing any obvious lip lines.
Then, apply a lighter shade of lipstick, focusing it on the centre of your lips. Purse your lips to blend the darker and lighter colours together. Here I am using MAC Lipstick in Snob.
Finally, apply a shimmery lipgloss, focusing again on the centre of your lips. Here I am using a Chanel glossimer lipgloss.
That's it!
Here's the finished look:
This was a really short post, but I hope it helped anyone looking to add a little volume to their lips! x
I am so excited about sharing this, because I haven't posted a tutorial since my camera was taken back to Malaysia a couple of months ago. I was itching like crazy to play with makeup this morning though, so I decided to use the lousy camera and post this! The colours aren't coming out clearly, but I hope it helps anyway!

I started with a makeup primer, because it gets hot during Christmas here, so having something for the makeup to stick to in the heat is gooood. I then applied Chanel Vitalumiere foundation. I used Shu Uemura H9 Eyebrow Pencil in Seal Brown to draw in my brows.


I hope you enjoyed this tutorial! Merry Christmas and happy holidays, everyone!
I started with a makeup primer, because it gets hot during Christmas here, so having something for the makeup to stick to in the heat is gooood. I then applied Chanel Vitalumiere foundation. I used Shu Uemura H9 Eyebrow Pencil in Seal Brown to draw in my brows.

Start with Etude House Proof 10 Eye Primer. Apply using the doe-foot applicator and blend using your fourth finger.

Then, apply a light green eyeshadow onto your lid. I used the top right colour from the Tom Ford Eye Color Quad in Silvered Topaz.

Using a fluffy brush, blend the edges of the eyeshadow out. I used the equivalent of a MAC 219.

To add to the green, use a darker green, like the Red Earth Illusion Lights Beauty Pro Eyeshadow in After Eight on the lashline. Apply using an angled eyeshadow brush, in upwards and outwards strokes.

Then, use a matte brown colour in your crease. I used the matte brown on the bottom right corner of the Tom Ford Eye Color Quad in Silvered Topaz.

Apply glitter over everything. I used the glitter-finish eyeshadow on the top left corner of the Tom Ford Eye Color Quad.

Apply black eyeliner to both your upper and lower lashlines. I used my favourite Ellis Faas Creamy Eyes in E103.
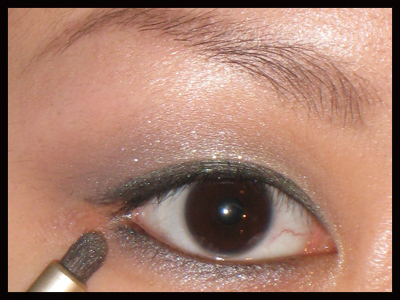
Then, using a small pencil brush, apply light green eyeshadow to your lower lashline, smudging the eyeliner and bringing it lower underneath the eye.


Then, use concealer and the brush of your choice to clean up under the eye and conceal any other flaws. I use Bourjois Healthy Mix Concealer in #51. Set the concealer and foundation with powder. I used Tom Ford Illuminating Powder for this.


Apply bronzer to contour your cheekbones and then apply blush to the apples of your cheeks. I used Sleek Contour Kit in Medium, and Tarte Amazonian Clay Blush in Dollface.

I am a total sucker for black eyeliner, so I intensified the line around my eyes with black liquid eyeliner. My liquid eyeliner of choice is the Face of Australia Liquid Eyeliner.

Apply mascara, followed by false eyelashes.

Then, apply a pinkish nude lipstick. I found an amazing colour combination that I LOVE, by mixing L'Oreal Colour Riche Lipstick in Fairest Nude with MAC Lipstick in Snob. I then applied a little lipgloss with gold shimmer in it to the middle of my lower lip.
Finally, I applied some highlighter to the tops of my cheekbones. I used Tom Ford Shade and Illuminate in Intensity One.
I hope you enjoyed this tutorial! Merry Christmas and happy holidays, everyone!
Hello, you gorgeous people! Happy Monday!

The look I'm posting today is actually something I did over the weekend. I received a new eyeshadow palette in the mail on Friday, and you know what a fan I am of eye looks, so I was really excited to try it out over the weekend.

As you may have noticed, I am also starting to become a huge fan of the lighter undereye area - this may be because I have clocked too many hours watching Keeping Up With the Kardashians. I am pretty much obsessed with Kim's makeup.
I can't get enough of MAC's Snob lipstick, either. I keep testing out new ways to wear it. I haven't figured out my favourite look yet, but I'll figure it out soon enough, I'm sure.

Products used:
Jemma Kidd Make Up School Light As Air Foundation in Light
Anastasia Beverly Hills Beauty Express Kit in Brunette
Face of Australia Liquid Eyeliner in Black
BeneFit BadGal Lash
MAC Mineralise Blush in Gentle
Bourjois Healthy Mix Concealer in #51 & # 52
Sleek Contour Kit in Medium
MAC Lipstick in Snob, topped off with Collection 2000 Cream Puff Lip Cream in Powder Puff
The palette that I am using was sent for review, and is from Smashbox's latest collection - Girls on Film Colour Collection. The palette is called the Photo Op Eye Palette in Smokebox. Smashbox released two palettes, and Smokebox features darker, smokier tones while the other, Softbox, is more neutral for daytime looks. I'll be posting a review soon, so look out for it!
In the meantime, if you want to swatch, check them out at Kit Cosmetics and Mecca Maxima. The collection also features two cream liner sets with travel brushes, two blushes, and two lip glosses. They are being released in stores today, so be sure to check them out!
The look I'm posting today is actually something I did over the weekend. I received a new eyeshadow palette in the mail on Friday, and you know what a fan I am of eye looks, so I was really excited to try it out over the weekend.
As you may have noticed, I am also starting to become a huge fan of the lighter undereye area - this may be because I have clocked too many hours watching Keeping Up With the Kardashians. I am pretty much obsessed with Kim's makeup.
I can't get enough of MAC's Snob lipstick, either. I keep testing out new ways to wear it. I haven't figured out my favourite look yet, but I'll figure it out soon enough, I'm sure.
Products used:
Jemma Kidd Make Up School Light As Air Foundation in Light
Anastasia Beverly Hills Beauty Express Kit in Brunette
Face of Australia Liquid Eyeliner in Black
BeneFit BadGal Lash
MAC Mineralise Blush in Gentle
Bourjois Healthy Mix Concealer in #51 & # 52
Sleek Contour Kit in Medium
MAC Lipstick in Snob, topped off with Collection 2000 Cream Puff Lip Cream in Powder Puff
The palette that I am using was sent for review, and is from Smashbox's latest collection - Girls on Film Colour Collection. The palette is called the Photo Op Eye Palette in Smokebox. Smashbox released two palettes, and Smokebox features darker, smokier tones while the other, Softbox, is more neutral for daytime looks. I'll be posting a review soon, so look out for it!
In the meantime, if you want to swatch, check them out at Kit Cosmetics and Mecca Maxima. The collection also features two cream liner sets with travel brushes, two blushes, and two lip glosses. They are being released in stores today, so be sure to check them out!


