

Phew, that title is a mouthful! But I am very excited to be able to make this video and share it with you guys.

If you're just starting out with makeup, it can be easy to get a bit overwhelmed by the brush reviews and recommendations out there. I've looked through my brush collection and narrowed it down to a minimal number and came up with this video - the ultimate guide to makeup brushes for beginners, and it's budget-friendly!
So here's the video. I hope you enjoy!
If you're just starting out with makeup, it can be easy to get a bit overwhelmed by the brush reviews and recommendations out there. I've looked through my brush collection and narrowed it down to a minimal number and came up with this video - the ultimate guide to makeup brushes for beginners, and it's budget-friendly!
So here's the video. I hope you enjoy!

A lot of people are confused about the BB cream trend and have a lot of questions. What is a BB Cream? Should I use a BB cream? How is a BB cream different from a foundation? Which is better, BB cream or foundation?
This post answers a few of those questions, and includes mini reviews of my favourite products, from both the BB cream and foundation families. Read on to find out more.
What is a BB Cream?
BB (a.k.a. blemish balm, and a host of other names since "blemish balm" was trademarked in Korea) cream was first formulated in Germany, and was used to treat the skin of patients who had just undergone surgery. BB cream is formulated with a host of skin-treating benefits, such as acne treatment, whitening, wrinkle treatment, sun protection, etc. The trend took off in a huge way in Asian countries (particularly Korea) and has started making waves in the Western cosmetics industry as well.
Should I use a BB cream?
Honestly, it's totally up to you. BB creams (generally) offer a bit more coverage than foundations, and almost always come with a generous amount of SPF. They are also thicker than most foundations, though less is needed compared to foundations when it comes to covering the skin. In my opinion, the skincare benefits of a BB cream compared to a foundation are negligible, so a BB cream is really not going to offer you that much more skin benefits compared to a foundation - it's mostly a marketing gimmick. So really what you want to do is compare the finish between a BB cream and a foundation to determine which one suits you and your needs best.
BB Cream Finish
BB creams tend to give your skin a more dewy, radiant finish. Because it was the Koreans who first caught on to BB creams, most formulations are very much oriented towards the Korean glowy skin trend. They are mostly quite full-coverage, providing a sort of all-in-one product, theoretically eliminating the need for concealer, sunscreen, or moisturiser.
Foundation Finish
Foundations offer you a lot more variety when it comes to finishes. They have sheerer formulations, matte ones, cream-to-powder, and so much more. Foundations tend to steer towards the more cakey side compared to BB creams (not all of them, mind you!) when they're full coverage, and if you're looking for something less cakey, you will need to use concealer to cover up any blemishes or dark circles.
At the end of the day, you need to listen to your skin's needs. If you live in a humid climate and/or have oily skin, you won't need a dewy finish foundation/BB cream. If you have lots of small imperfections that need covering, BB creams might work better for you because they contain more pigment and therefore give more coverage. Here's a more detailed list of the skin types that each type of base would cater to more adequately:
Foundation
Oily skin (go for mattifying foundations)
People who want a lighter texture in their base
People who like sheer coverage foundations (these look more natural)
BB Cream
Blemished skin
People who like dewy skin
Dry skin
My absolute favourites? They're all here!
Missha Perfect Cover BB Cream - great coverage, about average thickness. A teeny bit ashy.
La Roche Posay Hydreane BB Cream - fantastic coverage, not too thick. Their two colours are lovely - one has a pink undertone and the other yellow, but both aren't overwhelming so they look really natural on the skin.
Shiseido Perfect Hydrating BB Cream - a lovely light formulation with medium coverage. Great for those with oily skin because this is quite light.
Diorsnow BB Cream - fantastic coverage and a great glowing finish. Also not too thick.
Dr Jart+ Black Label BB Cream - this one has less coverage but is quite light, but is quite 'wet' on the skin. It gives the skin such a beautiful glow though!
Hera Age Away Foundation - I love this because it gives the skin a boost in radiance, yet doesn't feel too sticky or wet on the skin.
Make Up For Ever HD Foundation - this is a fantastic one because it is really light and you don't have to use a lot, but it does cover imperfections well. Looks fantastic on camera.
Benefit Hello Flawless Oxygen Wow Foundation - this one has decent oil control and coverage, and gives the skin a healthy look.
NARS Sheer Glow Foundation - this product really gives the skin a lovely glow, and despite its name, it actually is semi-matte, so it's great for humid climates/oily skin.
Diorskin Nude Foundation - I love this one because it's not dewy or sticky, but it gives the skin a glow, and the coverage is quite decent.
Do you have a favourite? Which do you prefer - BB cream or foundation?
What is a BB Cream?
BB (a.k.a. blemish balm, and a host of other names since "blemish balm" was trademarked in Korea) cream was first formulated in Germany, and was used to treat the skin of patients who had just undergone surgery. BB cream is formulated with a host of skin-treating benefits, such as acne treatment, whitening, wrinkle treatment, sun protection, etc. The trend took off in a huge way in Asian countries (particularly Korea) and has started making waves in the Western cosmetics industry as well.
Should I use a BB cream?
Honestly, it's totally up to you. BB creams (generally) offer a bit more coverage than foundations, and almost always come with a generous amount of SPF. They are also thicker than most foundations, though less is needed compared to foundations when it comes to covering the skin. In my opinion, the skincare benefits of a BB cream compared to a foundation are negligible, so a BB cream is really not going to offer you that much more skin benefits compared to a foundation - it's mostly a marketing gimmick. So really what you want to do is compare the finish between a BB cream and a foundation to determine which one suits you and your needs best.
BB Cream Finish
BB creams tend to give your skin a more dewy, radiant finish. Because it was the Koreans who first caught on to BB creams, most formulations are very much oriented towards the Korean glowy skin trend. They are mostly quite full-coverage, providing a sort of all-in-one product, theoretically eliminating the need for concealer, sunscreen, or moisturiser.
Foundation Finish
Foundations offer you a lot more variety when it comes to finishes. They have sheerer formulations, matte ones, cream-to-powder, and so much more. Foundations tend to steer towards the more cakey side compared to BB creams (not all of them, mind you!) when they're full coverage, and if you're looking for something less cakey, you will need to use concealer to cover up any blemishes or dark circles.
At the end of the day, you need to listen to your skin's needs. If you live in a humid climate and/or have oily skin, you won't need a dewy finish foundation/BB cream. If you have lots of small imperfections that need covering, BB creams might work better for you because they contain more pigment and therefore give more coverage. Here's a more detailed list of the skin types that each type of base would cater to more adequately:
Foundation
Oily skin (go for mattifying foundations)
People who want a lighter texture in their base
People who like sheer coverage foundations (these look more natural)
BB Cream
Blemished skin
People who like dewy skin
Dry skin
My absolute favourites? They're all here!
Missha Perfect Cover BB Cream - great coverage, about average thickness. A teeny bit ashy.
La Roche Posay Hydreane BB Cream - fantastic coverage, not too thick. Their two colours are lovely - one has a pink undertone and the other yellow, but both aren't overwhelming so they look really natural on the skin.
Shiseido Perfect Hydrating BB Cream - a lovely light formulation with medium coverage. Great for those with oily skin because this is quite light.
Diorsnow BB Cream - fantastic coverage and a great glowing finish. Also not too thick.
Dr Jart+ Black Label BB Cream - this one has less coverage but is quite light, but is quite 'wet' on the skin. It gives the skin such a beautiful glow though!
Hera Age Away Foundation - I love this because it gives the skin a boost in radiance, yet doesn't feel too sticky or wet on the skin.
Make Up For Ever HD Foundation - this is a fantastic one because it is really light and you don't have to use a lot, but it does cover imperfections well. Looks fantastic on camera.
Benefit Hello Flawless Oxygen Wow Foundation - this one has decent oil control and coverage, and gives the skin a healthy look.
NARS Sheer Glow Foundation - this product really gives the skin a lovely glow, and despite its name, it actually is semi-matte, so it's great for humid climates/oily skin.
Diorskin Nude Foundation - I love this one because it's not dewy or sticky, but it gives the skin a glow, and the coverage is quite decent.
Do you have a favourite? Which do you prefer - BB cream or foundation?
I'm trying to do more non-tutorial videos on my channel, and I thought this one would be something that you guys would like to watch!

I hope you enjoy the video :)
Products mentioned:
Shu Uemura The Lightbulb UV Compact Foundation - a great compact foundation that doesn't look too cakey on the skin. Read full review here.
Laura Mercier Smooth Finish Foundation Powder - another great compact foundation. Both these compact foundations are actually quite similar, and I highly recommend both.
Kiss Me Long & Curl Mascara and Kiss Me Volume & Curl Mascara - my favourite mascara combination at the moment, and I'm discovering that a lot of Malaysian girls also use this mascara. They both hold a curl really well, and they do wonders for the lashes. Read my full review here.
Dior Hydra Life BB Eye Cream - I bought this eye cream on Lisa Eldridge's recommendation in one of her makeup videos, however I'm not liking it very much, because this one really creases and falls into the fine lines of the eyes. It also isn't quite bright enough to do any real work concealing dark circles. I'm quite disappointed because her recommendations are usually spot on, but oh well!
Dermalogica Precleanse Wipes - a fantastic makeup remover that removes every trace of makeup, and quite easily. It does leave behind a tiny trace of oiliness on the skin, so I follow it with...
Bioderma Crealine H20 - this is a micellar cleansing water, and it is one of the most effective cleansing solutions for removing makeup, false eyelashes, etc.
Simplicité Great Outdoors Sunscreen - a lightweight, moisturising sunscreen that Simplicité says will not clog the skin. It feels really light on the skin, and so far I haven't broken out from it yet, which is good for my skin.
Kyrolan High Gloss in Toffee - even after buying and trialling so many other nude lipsticks, I still come back to this one time and time again. It is warm enough to be extremely flattering on the skin, plumps the lips, and looks amazing. I love the way it looks and feels!
Chanel Ombres Contrastes Duo in Sable-Emouvant - this is a basic combination of a brown and champagne eyeshadow
Make Up For Ever HD Compact Blush in 215 - this is MUFE's replacement for their HD pump blushes, and they did a fabulous job! These are much easier to blend (with fingers) and spread easily onto my cheeks without resistance or dragging, so my base makeup stays in place. I wouldn't recommend applying this product with a blush because it is so much easier and more user-friendly to apply with fingers.
The Lip Slip: One Luxe Gloss by Sara Happ - this is the gloss counterpart to Sara Happ's famous One Luxe Balm. It does hydrate the lips really well and helps to soften any cracks or flakes that you have on your lips. I purchased mine via Luxola.com.
rmk Super Basic Concealer Pact - this concealer isn't particularly pigmented (my favourite pigmented concealer is the one from Cathy Cat Korea - read my review and see it in action here - which has unfortunately been discontinued), but what it lacks in pigment, it makes up for in pure staying power. This concealer has a really thick consistency that helps it really stick to your skin and conceal imperfections once applied. The downside? If you don't blend properly, it can look quite patchy, especially once you try to set it with powder.
Shiseido Eyelash Curler - an eyelash curler that curls the lashes beautifully. If you have more of a flat eye, then this is the eyelash curler for you.
Melvita Rose Flower Water - if you're a fan of a more hydrated, plumped skin, then you should try finishing your makeup with a spritz instead of powder, or on top of powder. I like to use moisturising sprays for this, because I feel like they have a little bit more of a kick to them and hold the makeup in place better. This beautiful rose water from Melvita is kind to your skin and won't stress it out, so it's great to use for people with sensitive skin. It comes in a few other scents, and I really want to try the lavender scented one (I adore all things lavender!).
Tony Moly Backstage Gel Eyeliner - my current favourite gel eyeliner for its smooth, easy-to-apply texture and its great super black pigment. See it in action here.
Make Up For Ever HD Microfinish Powder - one of the best HD powders out there. Read my review on it (and a few other HD powders) here.
Rouge Bunny Rouge Highlighting Liquid in Seas of Illumination - this fantastic multi-tasker has become a favourite of mine. It has very finely milled microparticles of shimmer suspended in the thinnest liquid, so it is really easy to blend onto the skin, or into your moisturiser or foundation. The texture also makes it great for thinning out thicker cream foundations, whilst adding a lovely glow to the skin.
Daiso Eyelashes - these are so affordable and great for Asian eyes. They are cut just at the right length and width, and fit my eyes perfectly without my having to cut them. I also love that they're so affordable but still last a good 3-4 uses.
Smashbox Full Exposure Palette - one of my favourite neutral palettes at the moment. The variety of colour and the fact that the colours are quite neutral (meaning they don't lean too cool or warm and suit a great range of skin tones) gives this palette a great versatility. One little gripe I have is that the eyeshadows aren't as smooth as I expected them to be, and the shimmer eyeshadows are quite poorly pigmented.
Urban Decay Naked Palette - despite not using this a whole lot, I still think it's a great palette to own. The eyeshadows are buttery, smooth and pigmented, the colour range is great, and I love the textures of both the matte and shimmer colours. I'm not sold on the Naked 3 palette (too pink), but the first two are great.
Covo Cosmetics Timeless Eyeshadow Palette in Vibrant - I love that there's a Malaysian brand that I can recommend to overseas beauty buyers now. This eyeshadow palette is a mix of fantastic colours that make it incredibly versatile and a basic palette for creating so many different looks (what's great though, is that this palette comes in a nude eyeshadow version too :)) depending on what look you're going for. I love carrying this around with me because it gives me so many options to choose from, and the chance to try out brighter, more daring looks. The eyeshadow textures are lovely, and the shadows are pigmented. So far, this is shaping up to be a great palette!
I hope you guys enjoyed this video, and if you have any questions or comments about the products just leave them in the comments below! x

By now, everyone knows of the existence of HD powders, but not a lot know why they're called HD powders, and how they're different from other finishing powders out there. I'm here to shed a tiny bit of light on this, as well as to share and compare the performance of some of the HD powders I've tried before.
What is HD powder?
High Definition powders are one of the most recent releases in makeup land, and was formulated as the solution to HD television technology, hence its name. It is mostly made of silica powder. The powder is very, very finely milled, so a little bit goes a long way when it comes to HD powder. Generally, most HD powders are colourless, but some companies have produced coloured versions of these powders, which you will see later on in this post.
What does HD powder do?
The new, high definition TVs bring stark attention to flaws in the skin, so makeup had to provide a solution to counter that effect. Enter HD makeup.
In general, finishing powders set your makeup. They keep your makeup in place, and absorb some of the excess oil in the skin. HD powders, along with all HD formulated makeup, contain light diffusing particles, which soften the focus of the cameras on the skin and create a 'soft light' effect, hiding to some extent the flaws in the skin, and giving the skin a more glowy effect. If you'd like to see HD makeup in action, here's a YouTube video where I show you how to use HD makeup.
A word of warning: a tiny bit of powder really does go a long way, and this powder is completely invisible to the naked eye. You won't know if you've used too much, unless you take a photo of yourself with flash. Make sure you apply with either a fan brush or a kabuki brush, because these products disperse the powders loosely enough so that they won't flash back on camera.
A word of warning: a tiny bit of powder really does go a long way, and this powder is completely invisible to the naked eye. You won't know if you've used too much, unless you take a photo of yourself with flash. Make sure you apply with either a fan brush or a kabuki brush, because these products disperse the powders loosely enough so that they won't flash back on camera.
Why do I need HD powder?
If you're going to be photographed, you'll want to use HD powder to give your skin a glowy effect, as if it was lit by soft light (like candlelight). If you don't like the way makeup sits on your skin, HD makeup is very pigmented and is applied in a very thin layer on the skin, so it won't feel like you're wearing makeup. And if you like to take selfies, HD makeup is definitely for you :)
Which HD powder should I use?
Check out my reviews of the following HD powders to figure out what best fits your budget and needs :)
Make Up For Ever HD Microfinish Powder
This is one of the most popular HD powders out there, and the pioneer brand for HD makeup. The powder comes in two forms (as of March 2014) - a loose powder version that comes in a jar with a sifter, and a compact powder version. The Make Up For Ever HD powder is 100% silica powder, and is extremely fine. Only the tiniest bit of powder is needed to set your makeup and create that 'soft focus' effect. It gives your skin the most beautiful glow in photograph and is definitely a powder that lives up to its name and fame.
One thing I don't like about the powder though, is how little you need to use in order not to get that white-powder-flashback effect. In warm climates, makeup tends to move around, and I need more powder to set certain areas in my skin, particularly my undereye area. Unfortunately, using too little doesn't set my undereye concealer, and using too much creates that flashback effect.
Covo Cosmetics HD Picturesque Loose Powder SPF10
Covo is a Malaysian brand that is gaining quite a large and loyal following, and I love that I can recommend a brand for tourists to buy when they come visiting :)
Their HD powder is one of those powders that contain colour pigment, and is less finely milled than the MUFE HD powder. It comes in a compact that contains a grinder, and grinds out loose powder as you turn the grinder. If you're someone who thinks that they need a little more coverage after foundation and concealer, then this is the powder for you. It has a medium coverage, and comes with a convenient little brush (that is actually quite usable!) that you can use on the go. This one is not 100% silica, so it's not as difficult to use as the other HD powders and you're in no danger of over-applying.
NYX HD Studio Finishing Powder
NYX is an affordable but effective brand, and I have loved almost every product that I've tried from this brand. Their HD powder is no exception. It is 100% silica and finely milled (though admittedly, it doesn't have the smooth, silky feel of the MUFE powder). This is slightly more difficult to use than the MUFE HD powder because if you over-apply, the effect is much more obvious - probably because the powder is slightly less fine compared to the MUFE powder. It still does give your skin that lovely glow if applied properly, plus it is so affordable (I got mine on eBay for $13).
elf High Definition Powder
This is another one of those affordable powders (I got mine from iherb.com), and is lovely to use. It is more or less identical to the NYX powder, except for the sifter that dispenses the powder. I absolutely love the one in the elf packaging because the holes are smaller, so that the powder doesn't all spill out at one shake. The elf powders also come in a few formulations - one shimmer, one translucent, and one yellow colour-correcting, so they're a little different from the Covo powder.
Are you a fan of HD powder? Which one do you use? :)
We are constantly bombarded with new formulations, products and textures by cosmetics companies. It's understandable that the layperson might find these new formulations confusing and sometimes unnecessary. Why use all these new products when my regular powder eyeshadow works just fine?
I totally agree - if you're happy with what you've got and you're comfortable using only that, then by all means, stick to it. Don't fix what ain't broke, right?
If you like to play around with textures and colours, however, and just don't quite know how or are Googling around to find out, then this article is for you.
One product that has been introduced to the cosmetics market (and that doesn't seem to be going away anytime soon) is the crayon eyeshadow, or stick eyeshadow.

These crayons are simply eyeshadows in cream form, and are formulated slightly harder than cream eyeshadows (the ones that come in little pots - more on these products in another post) in order to be able to hold their shape in pencil form. Some come in pencil form and can be sharpened with a slightly larger-sized pencil sharpener, and some are simply twist-up pens.
They are simple and very easy to use - simply apply the product straight from the pencil onto your lid, taking it up to the crease, then blend. I recommend testing these pencil eyeshadows out first before using them on their own - because of the soft, creamy texture, some brands tend to crease and slip around on your eyelid.
How are they different from regular powder eyeshadows? These products look a little different - they create a slightly wetter, more dimensional look on the lid.
Why use eyeshadow sticks then?
For a different look - textures are slightly different when you use eyeshadow sticks.
For a more intense colour - when layered underneath powder eyeshadow of a similar colour, the colour and shimmer of the powder eyeshadow is much stronger and more obvious.
For a long lasting makeup - powder eyeshadow adheres better to cream eyeshadow, and also sets the cream eyeshadow in place. This combination helps your eyeshadow last for hours and hours without smudging, creasing, or melting off.
Here is the difference illustrated in swatches:


My favourite eyeshadow sticks:

NYX Jumbo Eye Pencils - these are by far the most affordable of the lot, but perform equally as beautifully as the higher end eyeshadow sticks on the market. They are very pigmented, and once set with a powder, stay on the lids forever. They come in a host of different colours, some shimmery and some matte, and are easily available in Sephora in Malaysia, and online in Australia at websites like Crush Cosmetics and eBay.

ck one color gloss eyeshadow sticks - these are beautiful, sheer eyeshadow crayons for those who want less pigment in their eyeshadows. They are lightweight and easy to apply onto the skin, and are a little bit more prone to creasing than other eyeshadows, so be sure that you only use this as an eyeshadow base. Because of their shimmery formulas, they create a gorgeous base on top of which to apply your eyeshadows, and give the powder eyeshadows a new, more 'wet' texture.
Laura Mercier Caviar Stick - this is the latest product to grace my beauty cupboard, and I have fallen head over heels in love with it. This is one of those rare products that doesn't need to be set with a powder eyeshadow, and has amazing lasting power. It sits on the lids through heat and humidity and somehow still manages to stay put without any creasing or melting throughout the day. Laura Mercier also has an entire host of colours to choose from with these caviar sticks, so I highly recommend these to anyone who wants a quick, easy, and convenient way to wear and touch up their eyeshadow throughout the day.
So what do you think? Are you an eyeshadow stick user, and if you aren't, would you purchase some? I personally find them very convenient, especially for intensifying my eyeshadow colours or to create a quick, no-fuss makeup look.
I totally agree - if you're happy with what you've got and you're comfortable using only that, then by all means, stick to it. Don't fix what ain't broke, right?
If you like to play around with textures and colours, however, and just don't quite know how or are Googling around to find out, then this article is for you.
One product that has been introduced to the cosmetics market (and that doesn't seem to be going away anytime soon) is the crayon eyeshadow, or stick eyeshadow.
These crayons are simply eyeshadows in cream form, and are formulated slightly harder than cream eyeshadows (the ones that come in little pots - more on these products in another post) in order to be able to hold their shape in pencil form. Some come in pencil form and can be sharpened with a slightly larger-sized pencil sharpener, and some are simply twist-up pens.
They are simple and very easy to use - simply apply the product straight from the pencil onto your lid, taking it up to the crease, then blend. I recommend testing these pencil eyeshadows out first before using them on their own - because of the soft, creamy texture, some brands tend to crease and slip around on your eyelid.
How are they different from regular powder eyeshadows? These products look a little different - they create a slightly wetter, more dimensional look on the lid.
Why use eyeshadow sticks then?
For a different look - textures are slightly different when you use eyeshadow sticks.
For a more intense colour - when layered underneath powder eyeshadow of a similar colour, the colour and shimmer of the powder eyeshadow is much stronger and more obvious.
For a long lasting makeup - powder eyeshadow adheres better to cream eyeshadow, and also sets the cream eyeshadow in place. This combination helps your eyeshadow last for hours and hours without smudging, creasing, or melting off.
Here is the difference illustrated in swatches:
ck one gloss color eyeshadow stick
Laura Mercier Caviar Stick
NYX Jumbo Eye Pencil
L-R: Eyeshadow stick, Powder eyeshadow, Powder eyeshadow layered on top of the eyeshadow stick.
My favourite eyeshadow sticks:
NYX Jumbo Eye Pencils - these are by far the most affordable of the lot, but perform equally as beautifully as the higher end eyeshadow sticks on the market. They are very pigmented, and once set with a powder, stay on the lids forever. They come in a host of different colours, some shimmery and some matte, and are easily available in Sephora in Malaysia, and online in Australia at websites like Crush Cosmetics and eBay.
ck one color gloss eyeshadow sticks - these are beautiful, sheer eyeshadow crayons for those who want less pigment in their eyeshadows. They are lightweight and easy to apply onto the skin, and are a little bit more prone to creasing than other eyeshadows, so be sure that you only use this as an eyeshadow base. Because of their shimmery formulas, they create a gorgeous base on top of which to apply your eyeshadows, and give the powder eyeshadows a new, more 'wet' texture.
Laura Mercier Caviar Stick - this is the latest product to grace my beauty cupboard, and I have fallen head over heels in love with it. This is one of those rare products that doesn't need to be set with a powder eyeshadow, and has amazing lasting power. It sits on the lids through heat and humidity and somehow still manages to stay put without any creasing or melting throughout the day. Laura Mercier also has an entire host of colours to choose from with these caviar sticks, so I highly recommend these to anyone who wants a quick, easy, and convenient way to wear and touch up their eyeshadow throughout the day.
So what do you think? Are you an eyeshadow stick user, and if you aren't, would you purchase some? I personally find them very convenient, especially for intensifying my eyeshadow colours or to create a quick, no-fuss makeup look.

Eyeliner is big. Almost everyone, even people who barely use any makeup at all, owns an eyeliner pencil. Unfortunately, most people aren't sure how to make their eyeliner last and avoid smudging, and trust me when I say this is a big issue.
I'm here to attempt to tackle these issues in this post, so hopefully this is of some help. So here we go:

If you have very oily eyelids, start with a primed eye. Make sure to get that primer all the way along your lashline as well.
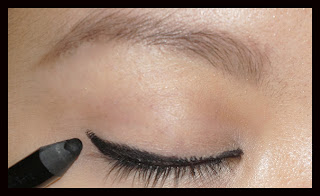
Apply your pencil eyeliner in the shape that you desire. No need to be too neat at this point - just get the overall shape right. Here I am using the Avon Supershock Gel Eyeliner in Black.

Now this part is important - with a pencil brush, smudge the eyeliner. This will create that smoky effect that everyone wants with pencil eyeliners (and if you don't want that smoky effect, you really shouldn't be using pencil eyeliners, because they are notoriously smudge-prone. Instead, try a liquid or gel eyeliner) and also help to set the pencil, so that you don't get any stray pigment falling down later.
I am using the Boots No7 Smokey Eyeliner Brush.

Next, apply concealer to your undereye area. This actually helps create a 'barrier' to prevent the eyeliner from smudging downwards underneath the eye. I am using my favourite Bobbi Brown Creamy Concealer in Ivory.

This step is just as important as the concealer - you need to then apply a finely milled powder on top of the concealer and the eyeliner to set both these products and help them stay budge-proof. I used the L'Oreal Paris Nude Magique BB Powder in Light.
At this point, you have three choices. You can leave it as it is and move on to do the rest of your makeup, or if you want to make your eyeliner more intense, you can do the following:

Pick up a brown eyeshadow with your smoky liner brush, and apply it directly on top of your eyeliner. Smudge it upwards as well to increase the smokiness. This is a great technique if you are mono-lidded, and don't want to take your eyeliner all the way up into your crease, because this still gives you that dimension and shows up above the eye when it's open, but without the need to take your eyeliner all the way up.

Or, if you want a more intense, less smoky eye, you can also apply a liquid eyeliner on top of the pencil liner. Make sure you stay within the edge of the pencil liner, so that you still have that soft finish, without needing to blend further. Here, I am using the ck one liquid eyeliner.

Mar 26, 2013 | What the finished result of my latest eyeliner post looks like! http://k.to/1t7v by emilyquak on Keek.com
Thanks so much for reading! x
You all probably already know that makeup brushes are capable of breeding massive, disgusting amounts of bacteria. Cleaning your brushes regularly is essential if you want to avoid problems like acne and eye infections.


Cleaning makeup brushes is very simple. Here are some tips that you may or may not already know.
- Deep clean your brushes at least once a month
- To deep clean your brushes, simply place your brush cleansing solution into a wide, shallow dish, and swirl your brush into the solution to clean it. Then, under running water, swirl your brush into the palm of your hand to remove the dirt, makeup, and cleansing solution. Repeat until the water in your palm runs clear.
- Be careful to stay away from the ferrule of the brush (the metal part holding the hair), because wetting the ferrule can loosen the hairs and cause a lot of fall out.
- Spot clean your brushes each time you use them. To spot clean, spritz some brush cleanser directly onto the brush hairs, then swirl the brush onto a clean towel (or wipe) to clean.
- Once cleaned, brush hairs should be squeezed gently with a clean, dry towel. Then, place the brushes, laying them flat, onto the towel, preferably with the hairs sticking out over the edge of the counter, so that they dry all over. Doing this prevents excess moisture from seeping into the ferrule and allowing mould to grow.
Here are some products that I use to clean my makeup brushes, and that I have been absolutely loving.
Daiso Sponge Detergent
This is the product that the entire beauty blogosphere has been buzzing about for a while now. I purchased mine in Malaysia, and have been using it non-stop ever since. This deep cleans makeup brushes beautifully and effectively, and keeps the bristles nice and soft. Deep cleaning should be done once a month, at the very least, to get rid of bacteria lingering deep within the bristles of your brushes.
I also like to mix a few products in with this - pure mineral water, a teeny, tiny bit of alcohol, and a cheapie hair conditioner, to spritz onto my brushes before I spot clean them right after they are used. It works beautifully, and I have the added benefit of nice-smelling brushes ;p
I also like to mix a few products in with this - pure mineral water, a teeny, tiny bit of alcohol, and a cheapie hair conditioner, to spritz onto my brushes before I spot clean them right after they are used. It works beautifully, and I have the added benefit of nice-smelling brushes ;p
Dove Beauty Bar
Another product that I love to use for deep cleaning is the Dove Beauty Bar. I learned this method from the gorgeous Kimmi at ThePlasticDiaries, and this is the method I use when I go on extended trips (usually to visit home), or when I can't be bothered with the Daiso detergent. I was lucky enough to get a couple of sample-sized bars in goodie bags, and I am loving how convenient they are!
All you have to do is swirl the brush under running water onto the soap bar, and your brushes are thoroughly cleansed and remain nice and soft. Another plus point? These beauty bars are SO affordable!
Makeup Removing Wipes
These products are my absolute favourite for spot-cleaning brushes. I spot-clean my brushes every time I use them, and makeup removing wipes are so convenient to have whilst I am applying my makeup. I clean my brushes, my hands, and remove any makeup mistakes with these wipes.
As mentioned earlier, I have a simple spray formula that I mix up using the Daiso detergent, which I spritz onto my brushes, then swirl into these wipes to cleanse and dry them slightly, and then I place them lying down with the bristles sticking out over the edge of my makeup drawers to dry.
My current favourite makeup removing wipes? The Dove Beauty Cleansing Wipes. These are very gentle but effective, and don't contain alcohol (since my spray already contains alcohol, I don't want to overload my brushes with alcohol unnecessarily).
I hope this post was helpful! x
A pet peeve of mine is when people don't blend their eyeshadow properly. Whether you are doing a smoky eye or a simple, everyday look, blending is key. When blended, eyeshadow looks so amazingly beautiful and I feel like just a little bit more effort would have made those eyes look so much more beautiful and put-together.

I picked up a couple of tips here and there about eyeshadow blending in my years of playing around with makeup, and I thought I might share them here.
First off, brushes! Now I must stress that you can blend eyeshadow without brushes, and you don't need to go out and buy these brushes. But brushes make the whole process a lot easier and quicker, and if you use the right brush, the finish is a lot more polished too. Here are my favourite brushes.

The MAC 239 brush, or Sigma E55 Eye Shading brush (or in my case, simply brush similar to these two brushes), is the perfect brush for packing on product when you first apply your eyeshadow. These brushes are great because they pick up and deposit a lot of product onto your eyelid. This way, you get a solid block of intense colour on your eyelid from the get-go.
You can also use your fingers in place of this brush, simply reapply a couple of layers to achieve the intensity you want.

The Sigma E25 blending brush (or its 217 MAC equivalent) is the hero of blending brushes. This is the perfect blending brush, whether you have large, small, or extra small eyes. This brush is made perfectly for blending out product and is fool-proof! It is tapered at the tip (forgive my brush - it's a little splayed because I had just cleaned it for this shot) so you can get to the very edge of the eyeshadow and blend it out into a nice haze of colour. It is also perfect for the crease

When you want your crease to look a little more defined, you need a brush that is more tapered at the tip, and I have found that the NP Set Crease Blender brush serves my needs perfectly. It is small enough so that it fits into my crease, and fluffy enough so that the crease colour doesn't get deposited as a strong line, and also fluffy enough so that I can blend my crease colour with it, without having to use another brush.
Now on to the actual techniques!
Initial Application

When I apply my base eyeshadow to my mobile lid, I like to use my fingers. This way, I can warm up the product, and really pack it on. Just circle your clean finger into your eyeshadow, then push onto your lid. You can twist or drag your finger a tiny bit after pushing the eyeshadow down onto your lid. This will pack it onto your lid. When I need a more intense colour, I use a primer and the MAC 239 brush.
Blending

When you are using light or neutral colours, your fingers are more than good enough to blend the colour out. Darker colours are less forgiving, so I would recommend using the E25 brush.


As you can see, darker coloured eyeshadows are much less forgiving and can look a lot more harsh when applied. The same goes with matte eyeshadows. They require a little extra attention and care, but in the end, the result is exactly the same.


When applying your crease colour, use a blending brush and apply directly into your crease (this should be where the very edge of your eyeshadow is). The reason why I recommend blending out your eyeshadow first before applying a crease colour, is that it makes it easier and quicker to apply eyeshadow this way, even though you could technically do both at the same time.
The crease colour should also blend into nothing towards the brow bone.

I picked up a couple of tips here and there about eyeshadow blending in my years of playing around with makeup, and I thought I might share them here.
First off, brushes! Now I must stress that you can blend eyeshadow without brushes, and you don't need to go out and buy these brushes. But brushes make the whole process a lot easier and quicker, and if you use the right brush, the finish is a lot more polished too. Here are my favourite brushes.
MAC 239 brush
The MAC 239 brush, or Sigma E55 Eye Shading brush (or in my case, simply brush similar to these two brushes), is the perfect brush for packing on product when you first apply your eyeshadow. These brushes are great because they pick up and deposit a lot of product onto your eyelid. This way, you get a solid block of intense colour on your eyelid from the get-go.
You can also use your fingers in place of this brush, simply reapply a couple of layers to achieve the intensity you want.
Sigma E25
The Sigma E25 blending brush (or its 217 MAC equivalent) is the hero of blending brushes. This is the perfect blending brush, whether you have large, small, or extra small eyes. This brush is made perfectly for blending out product and is fool-proof! It is tapered at the tip (forgive my brush - it's a little splayed because I had just cleaned it for this shot) so you can get to the very edge of the eyeshadow and blend it out into a nice haze of colour. It is also perfect for the crease
NP Set Crease Blender Brush
When you want your crease to look a little more defined, you need a brush that is more tapered at the tip, and I have found that the NP Set Crease Blender brush serves my needs perfectly. It is small enough so that it fits into my crease, and fluffy enough so that the crease colour doesn't get deposited as a strong line, and also fluffy enough so that I can blend my crease colour with it, without having to use another brush.
Now on to the actual techniques!
Initial Application
When I apply my base eyeshadow to my mobile lid, I like to use my fingers. This way, I can warm up the product, and really pack it on. Just circle your clean finger into your eyeshadow, then push onto your lid. You can twist or drag your finger a tiny bit after pushing the eyeshadow down onto your lid. This will pack it onto your lid. When I need a more intense colour, I use a primer and the MAC 239 brush.
Blending
When you are using light or neutral colours, your fingers are more than good enough to blend the colour out. Darker colours are less forgiving, so I would recommend using the E25 brush.
What you want to do when blending, is go back and forth in a window-wiper motion. It is fine to blend in smaller window-wiper strokes instead of sweeping back and forth across the entire lid - whatever makes you feel more comfortable. At the very outer edges of your eyes, try to blend in small circular motions - this will give the eyeshadow a more blunt edge and avoid any excess eyeshadow being deposited there.
The key is to blend and keep blending until your eyeshadow creates a gradient of colour from the lid to the brow bone. If you end up wiping off most of the eyeshadow on your mobile lid, you can just reapply your eyeshadow and then blend again - less blending will be required after this step. It sounds like a lot of work, but once you get the hang of it, it takes under a minute to complete.
This is important: Just because the edges of your eyeshadow look soft, does not mean that your eyeshadow is blended! You want to create a gradient of colour fading out into nothing!
There are some makeup looks that require a stronger eyeshadow edge, but as a general rule, no lines, not even soft ones, are acceptable! Here is an example of a soft edge, but incompletely blended eyeshadow - a big no-no!
Dark and Matte Eyeshadows
As you can see, darker coloured eyeshadows are much less forgiving and can look a lot more harsh when applied. The same goes with matte eyeshadows. They require a little extra attention and care, but in the end, the result is exactly the same.
Instead of fingers, I recommend using the Sigma E25 (or MAC 217) brush to blend. Again, finger-blending is possible, but the brushes just make it easier.
When blending darker colours, I find it handy to have an extra E25 on hand. This is because when you are trying to create a gradient of eyeshadow that blends out into nothing, a product-loaded brush is only going to deposit more eyeshadow where it is not needed! An extra brush is perfect at times like this.
The Crease
I am a huge fan of the crease colour. I find that a matte brown eyeshadow ties looks together beautifully, and makes the finished product look a lot more professional. My current favourite crease colour is the Sleek Face Contour Kit in Medium.
When applying your crease colour, use a blending brush and apply directly into your crease (this should be where the very edge of your eyeshadow is). The reason why I recommend blending out your eyeshadow first before applying a crease colour, is that it makes it easier and quicker to apply eyeshadow this way, even though you could technically do both at the same time.
The crease colour should also blend into nothing towards the brow bone.
The NP Set Crease Blender brush comes in when you want a more defined crease. This deposits the crease colour more cleanly into the crease, instead of the wash of colour that the blending brush would deposit. Use the same window wiper motion, but with this brush you might want to be a little more light-handed, because the bristles are quite long and can be a little bit difficult to control. Also, being too heavy-handed can result in a strong line being applied, which is an absolute horror to blend out, trust me.
I hope these little tips help you out the next time you're getting ready! Thanks for reading and have a gorgeous day x
Almost all of us have had a night or two when we partied a little too hard, laughed a little too loud, and drank a little too much. And almost all of us have paid the price the next morning when we awoke to sore throats and angry, broken out skin.

Bioré Makeup Removing Wipes (25 pack, AUD 8.99; 10 pack, AUD 3.99)


Anyone who's stayed up late, whether to party or to cram for exams, knows the pain of having to try and conceal puffy, dark, tired eyes. A great way to reduce the appearance of tired eyes is to pat on a good eye cream before going to bed.
Uriage AquaPRECIS Moisturising Eye Contour Care (15ml, AUD 39.95)

There is only one way of avoiding the morning after - don't have the big night. But for those of us who can't help ourselves, or indulge in the occasional big night, here are a few important skincare basics, for both the big night and the morning after.
Always, ALWAYS remove your makeup
I know the last thing you want to do when you're stumbling home at 4AM is to hover above a sink and fuss over your face and teeth, but trust me, it will be worth it in the morning. Makeup left on overnight can clog up the skin and interrupt the skin's renewal, so it is absolutely essential to remove every little bit of makeup before you go to bed.
Some brands have made it exceedingly simple and quick to remove your makeup, so you can do what you really want to do - just collapse onto your bed and close out the rest of the world!
Bioderma Créaline H20 (pink cap) and Sébium H20 (green cap)
These cleansers are an absolute godsend - they cleanse thoroughly and effectively, and yet, are gentle on the skin. What's better - you don't need to rinse them off with water! Just pour the product onto a cotton pad, and wipe it off. Pat dry, and you are done! Remember that the Sébium H20 is not meant to be used on the eyes, but it does a fabulous job and ridding the skin of grease and regulating the sebum production.
For more information, read my review on the Créaline H20 here (250mL, AUD 39.95) and the Sébium H20 here (200mL, AUD 29.95).
These makeup wipes remove even the most stubborn waterproof mascara, and leave your skin feeling tingly fresh after you're done. They are formulated with Tea Tree, which is great for preventing breakouts, and they smell divine! A no-fuss essential for getting rid of makeup after a big night out.
Moisturise your skin
Alcohol and/or lack of sleep can have a very detrimental effect on your skin, the most common of which is dehydration. This can cause dull skin and premature wrinkles, and affects the skin's overall health as well. It is crucial to try and replace the lost moisture in your skin with a good moisturiser or moisturising serum. Some fantastic ones to try are:
Kiehl's Ultra Facial Cream (50mL, AUD 34)
This is an intensely hydrating, very rich cream (oilier skins may want respond better to the Ultra Facial Moisturiser) that offers round-the-clock hydration in addition to preventing further moisture loss. It is packaged in two sizes, a 50mL and a 125mL, and doesn't feel greasy on the skin, which can be a bother especially when you're probably going to do the face-plant onto your pillow 5 minutes later.
Kiehl's Rosa Arctica Youth Regenerating Cream (50mL, AUD 84)
Another amazing moisturiser by Kiehl's, this cream utilises the regenerative qualities of the Haberlea Rhodopensis (otherwise known as the Resurrection Flower) to prevent ageing and boost the skin's radiance. It is also highly moisturising and very rich. The best way to apply this is to warm it up between your fingers, then pat it onto your face.
Ella Baché Hydra-Revitalising Crème de la Crème (50mL, AUD 105)
Ella Baché Hydra-Revitalising Crème de la Crème (50mL, AUD 105)
This gorgeous moisturiser is lightweight, yet delivers amazing results. It keeps your skin moisturised and plump, without the greasiness and thickness often associated with deeply hydrating products. It is perfect for more oily skins, because it does the job without adding unnecessary oil to the skin.
Biotherm Aquasource Nuit High Density Hydrating Jelly (50mL, AUD 59)
This night serum is amazing at providing intense hydration to your skin. It absorbs instantly and works wonderfully overnight to give you plump, soft skin in the morning. It also smells so beautifully light and refreshing. Apply one pump and pat into your skin. It absorbs very quickly and feels velvety smooth on the skin. No greasy film! Face-plant WIN.
De-Puff, Brighten, and Hydrate!
Anyone who's stayed up late, whether to party or to cram for exams, knows the pain of having to try and conceal puffy, dark, tired eyes. A great way to reduce the appearance of tired eyes is to pat on a good eye cream before going to bed.
Uriage AquaPRECIS Moisturising Eye Contour Care (15ml, AUD 39.95)
Formulated with the healing qualities of the thermal springs in France, Uriage skincare both heals and moisturises the skin. Due to the make-up of the thermal water (I won't bore/confuse you with the science here), the skin more readily absorbs this eye cream. This eye cream brightens the eyes and provides continuous moisture, and is oil free, fragrance free, paraben free, and hypoallergenic.
emerginC Scientific Organics Eyelight Cream (15ml, AUD 65)
This cream is rich and moisturising, and contains antioxidants designed to fight the appearance of fine lines, wrinkles, puffiness and under-eye circles, while hydrating and brightening. If you've got a bit of cash to spend, then this is a great night eye cream to splurge on, because it does wonders to hydrate and reduce fine lines and puffiness around the eyes.

The Morning After
After the big night, your skin is definitely going to need some TLC. It is most likely dehydrated, and will look ruddy and dull. The best you can do for it is to use gentle, hydrating skincare, and follow that up with a hydrating mask to replenish moisture and calm the skin.
Guinot Instant Radiance Moisturising Mask (50mL, AUD 69)
This mask is the perfect one-two-punch all rolled into one little tube. The essential oils in the mask provide excellent hydration, and stimulates the blood so that the skin looks more energised and radiant. It also smells beautiful, which can't be bad for that hangover :)
Dermalogica Skin Hydrating Masque (75mL, AUD 61.50)
If it's instant, intense hydration you're after, you can't get much better than this mask. It only needs 10 minutes to work its magic, and your skin emerges smooth, plump, and moisturised after!
Caudalie Moisturising Cream Mask (50mL, AUD 32.90)
This is a multi-purpose, cheaper alternative that performs just as well as the more high-end products. Apply for 15 minutes and once you wash it off, your skin will look and feel soft and supple. You can even use this around the eyes and as an overnight mask - perfect for re-hydrating overnight!
Morning After Makeup
As it is with skincare, the morning-after makeup also needs to be nourishing and hydrating. Some great base products to apply before your makeup are:
Dermalogica Skin Perfect Primer SPF30 (22mL, AUD 79)
You all know I love my multi-tasking products. How can you go past makeup that also functions as skincare?! It's genius! The Dermalogica Skin Perfect Primer just launched this September 2012, and can - *inhales* - even out your skin tone, provide sun protection, enhance the skin's luminosity, fill in surface irregularites (i.e. pores and fine lines), absorb excess oil, stimulate collagen replenishment (anti-ageing YES!), moisturise the skin, stimulate cell renewal, and help your makeup stick to your skin. How's that for multi-tasking?!
This is the perfect product to both prep and protect your skin for the long day ahead. You can even wear it on its own.
Uriage Bariederm Reconstructive Barrier Lip Balm (15mL, AUD 19.95)
This lip balm is great for repairing chapped lips, and as a bonus, also provides a protective barrier to shield the lips from whatever lip product you want to apply. It lasts for up to four hours on the lips, providing continuous hydration.
L'Oreal Paris Youth Code Luminosity Hydrating Day Cream (AUD 29.95)
Infused with L'Oreal Paris' patented Lumi-Gen technology, this day cream offers both moisture and illumination. The cream contains pearly, illuminating particles, and instantly brightens and illuminates your skin upon application. It also works to even and correct your skin tone, and create more luminous-looking skin.
L'Oreal Paris Nude Magique BB Cream (AUD 26.95)
BB creams are perfect for the morning after, because they offer hydration and have beneficial effects on the skin. This BB cream also corrects dull and uneven skin, and contain pigments that adapt to your natural skin tone. Though moisturising, this BB cream doesn't feel at all heavy on the skin, and gives you a natural, healthy glow to your skin.
Most Importantly
Remember to HYDRATE! Drink lots of water whilst you are out and after you get home, before you go to bed. Keep a bottle of water beside you so that if you wake up at night for whatever reason, you can drink more. And once you wake up in the morning, drink some more!
I hope this post helps! It might seem like a lot of work, but your skin will thank you for this! x
Hi guys! I'm doing another makeup basics post today, this time of the ever elusive 'How to determine the undertone of your skin'.
I'm not going to go too far into details because it is unnecessary as far as makeup goes. This post is simply for you to find out what kind of makeup you should purchase, and what will complement your skin tone best!
First off, here is what you will need:
- A mirror/camera (I find that cameras work best because you can look at the pictures side by side to compare them.
- Bright natural light
- A white towel or shirt
- A hair tie
- Two pieces of paper with the following prints:


6. One piece of silver aluminium foil
7. One piece of golden foil
This is the easiest way to find out your skin's undertone. Pull all your hair back and cover your clothes with a white towel, or simply put on a white shirt.
Then, hold one of the pieces of paper up against your face, and take a picture of yourself. Here, I am using a blanket because I happened to have a very cool-toned and a very warm-toned blanket (how convenient!) :)


As you can see in the picture above, my face overall looks more healthy and glowing in the second picture, indicating a warm undertone.
This isn't conclusive, because you still want to find how warm-toned you are, because that will then tell you what kinds of makeup colours will suit your face the best.
Now, use the gold and silver pieces of foil.


As you can see in the pictures above, my face doesn't show any difference in overall health and radiance, no matter which foil I hold up against my face.
This means that my skin has an overall warm undertone, but leaning towards a neutral undertone. This means that I can wear cool-toned makeup (but not overly cool! Think high-shimmer pastels) as well as warm-toned makeup.
Foundation and Concealer
It is very important to choose a foundation that matches your undertone, because a mismatching foundation can look extremely weird on the skin. Concealer is a different story altogether, because depending on what you are trying to conceal, you might need different colours to offset your flaws.
Eyeshadow
As far as eyeshadows go, I don't believe that there are any rules as to what colours you should or shouldn't wear. However, sometimes eyeshadow that is too cool-toned can make warm-toned skin look washed out and vice versa, so a great way to counteract that is to run a warm or cool-toned brown eyeshadow (warm if you're warm-toned, and cool if you're cool-toned) into your crease. This ties the whole eye look together and helps the makeup blend into your skin.
Blush
There are no rules when it comes to blush either, but I have to say that a good blush can do wonders for your skin! Jennifer Aniston is the perfect example of the perfect blush!

Jennifer Aniston is warm-toned. Her blush always has dark, plum/mauve undertones, or terracotta/coral undertones to suit her skin, and it always complements her skin and makes her face look absolutely radiant.
If you are cool-toned, look for blushes with bluish pink undertones, or cool lavender undertones.
Lipstick
I think with lipstick, it is important to use a lipstick that complements your natural undertone when you are at extreme ends of the spectrum. When choosing red/dark lipsticks, follow your undertone. Cool undertones should choose lipsticks that have a blue/purple undertone, and warm undertones should pick red lipsticks with more of an orange/coral hue. The same goes with choosing nude lipsticks. Here are some very rough examples of warm vs. cool lipstick colours:


Warm hues on the left, and cool hues on the right.
Medium shades are usually pretty easy to wear no matter what the undertone, so again, it is just a matter of preference and experimenting. Don't be afraid to try out diffferent colours and break the 'rules'.
There are no strict rules when it comes to makeup, but choosing the right colours can help complement your skintone and boost your radiance. But always, always keep in mind that you are meant to have fun with makeup! There are to strict rules and sometimes the 'wrong' colour could look absolutely amazing on you!


