Get the Look: Burlesque Inspired Flapper Tutorial
Tuesday, May 17, 2011Hello, everyone! I hope you're having a great day so far! I'm posting a Burlesque inspired tutorial today, because my Mom was meant to host an event with a 20s theme and she asked me about this makeup look. I photographed it today and sent it to her, only to find out that they have decided to go with a masquerade ball theme instead -.-
On the bright side, there should be a masquerade inspired tutorial coming soon on this blog!
Anyway, on with the look:
I obviously modernized it a little, because I don't think anyone wants to go to an annual ball with stick thin eyebrows and mini geisha lips. Here's how to get the look:
Start without a base. The black eyeshadow application should be a little messy, so we will have to clean up before applying foundation.
Start with your eyebrows. They should be dark and thin. The rounder the arch of your eyebrow, the more true to the makeup you will be. I am using SAX Creme Eye Definer in Brown-Black.
Apply a black eyeshadow base. I am using Benefit Creaseless Cream Eyeshadow in Smut. Take it onto your lower lashline as well.
Blend out the cream shadow with a fluffy blending brush. Don't worry if it's light or thin. You don't want too thick a layer because it will crease.
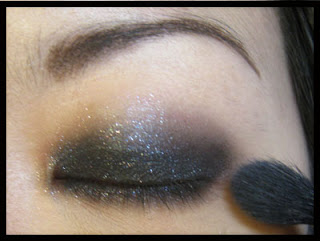
Next, apply a black eyeshadow. I chose a glittery eyeshadow because I think it's more fun and glamorous for a nighttime event. I am using Ameli Sparkle Spot Eyeshadow in Black Scandal.
Blend the eyeshadow out at the edges with your fluffy blending brush. Don't spread it too far out - we want to keep it neat and near the crease.
You can reapply the black eyeshadow as needed to increase intensity. Once you're done applying the eyeshadow and blending it out, you can clean up under the eye with a cotton pad and some makeup remover. Apply your foundation and concealer. I used Giorgio Armani Luminous Silk Foundation and Bourjois Healthy Mix Concealer. I used a concealer a couple of shades lighter than my actual skin tone, to keep with the general theme of the makeup.
Line your upper and lower lashlines with a black eyeliner. Here, I am using Prestige Ultimate Eye Definer in Blackest Black. If your black eyeshadow isn't as black as the liner, then you should smudge the pencil line with a pencil brush or small sponge.
Apply a blusher. For this look, you want to keep the blush along your temples in a 'C' shape. Take a little bit of that blush down underneath your cheekbones to contour. If you want to stay as close to the original makeup as possible, use a bright red blush. Here, I took a bright red matte colour from my 88 Shimmer and Matte Colour palette.
For the lips, first take a concealer to white-out your natural lip line. I used Bourjois Healthy Mix Concealer in #52.
Next, take a dark brown liner, and line your lips. Keep just under your natural lip line, and exaggerate the cupid's bow. You want to create almost a heart shape here. You want to use a darker lip liner so that your lips have a dark feel without actually having to mix black into your red lipstick. I am using NYX Lip Liner in 1000 Years.
Using a lip brush, apply a dark red lipstick, following the lines created with your lip liner. I am using NYX Round Lipstick in Snow White.
Using an eyshadow brush, apply a matte white eyeshadow to your brow bone. I am using a simple white colour from my 88 Shimmer and Matte Colour palette.
Finally, set your face with a translucent loose powder. Apply it all over your face, because you want a matte, powdery finish with this look.
I went a step further because I had a zit on my cheek, so I made it a mole :D
Here's a close-up of my eyes. I am in love with this eyeshadow, seriously!
I hope you guys enjoyed this tutorial!


36 comments